上一篇介紹了GPIO的基礎,在這篇將詳細介紹 GPIOLIB
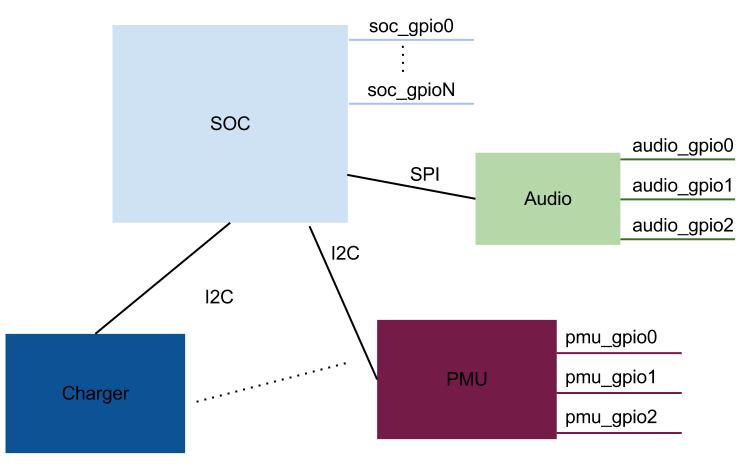
在以前,假設我們chip上面都有提供GPIO。假設我們今天要 call soc上面的GPIO我們可以使用gpio_direction_output()。但是如果要使用audio chip上面的GPIO以下圖為例,我們可能就得呼叫audio_gpio_direction_output() depends on chip 的driver實作。
為什麼呢?因為每個chip如何去控制他們的GPIO作法可能會不一樣,並且要填的memory位址也不一樣。這麼一來會造成什麼現象呢?如果chip一多,要分別控制上面的GPIO 我們可能就會看到一堆 audio_gpio_direction_output、 pmu_gpio_direction_output、 charger_gpio_direction_output。而且,以gpio_direction_output為例,可能每一個driver的實作都會有一些重複的code例如檢查是否valid等等。
因此,GPIOLIB的引入可以解決這個問題。每一個chip都使用gpio_chip結構來表示,每一個chip driver實作可以定義GPIO的個數、號碼及相關的callback function。
以gpio_direction_output為例。當我們呼叫gpio_direction_output(number)之後,gpio_direction_output實做在GPIOLIB中,它會去檢查這個number的GPIO是屬於哪個chip然後去call 該chip的driver的request實作。
註冊gpio_chip
我們從nVidia的git抓下來的kernel裡面隨便找driver/gpio/wm8994-gpio.c為例子trace一下。他的probe如下:
static struct gpio_chip template_chip = {
 .label   = "wm8994",
 .owner   = THIS_MODULE,
/**
 *如果執行gpio_direction_input的GPIO number屬於這個chip
 *則執行wm8994_gpio_direction_in這個callback function
 *以下同義
*/
 .direction_input = wm8994_gpio_direction_in,
 .get   = wm8994_gpio_get,
 .direction_output = wm8994_gpio_direction_out,
 .set   = wm8994_gpio_set,
 .dbg_show  = wm8994_gpio_dbg_show,
 .can_sleep  = 1,
};

static int __devinit wm8994_gpio_probe(struct platform_device *pdev)
{
    struct wm8994 *wm8994 = dev_get_drvdata(pdev->dev.parent);
    //取得platform_device定義的platform_data
    struct wm8994_pdata *pdata = wm8994->dev->platform_data;
    struct wm8994_gpio *wm8994_gpio;
    int ret;
    wm8994_gpio = kzalloc(sizeof(*wm8994_gpio), GFP_KERNEL);
    if (wm8994_gpio == NULL)
 return -ENOMEM;

    wm8994_gpio->wm8994 = wm8994;
    /**
     *我們剛剛有說每一個chip使用gpio_chip結構表示。
     *上面宣告了template_chip的gpio_chip結構。
    */
    wm8994_gpio->gpio_chip = template_chip;
    wm8994_gpio->gpio_chip.ngpio = WM8994_GPIO_MAX;
    wm8994_gpio->gpio_chip.dev = &pdev->dev;

    //取得gpio_base。意思是這個chip的GPIO number從多少開始編號
    if (pdata && pdata->gpio_base)
 wm8994_gpio->gpio_chip.base = pdata->gpio_base;
    else
 wm8994_gpio->gpio_chip.base = -1;

    //將這個gpio_chip 註冊進去。待會將分析gpiochip_add
    ret = gpiochip_add(&wm8994_gpio->gpio_chip);
    if (ret < 0) {
 dev_err(&pdev->dev, "Could not register gpiochip, %d\n",
         ret);
 goto err;
    }

    platform_set_drvdata(pdev, wm8994_gpio);
    return ret;

err:
 kfree(wm8994_gpio);
 return ret;
}
接著我們看一下gpiochip_add() 做了什麼事。
//擷取gpio_desc的定義。gpio_desc定義了GPIO是屬於哪個chip,他的flag及label。
struct gpio_desc {
 struct gpio_chip *chip;
 unsigned long  flags;
#ifdef CONFIG_DEBUG_FS
 const char  *label;
#endif
};
//gpio_desc陣列存放著所有gpio的定義
static struct gpio_desc gpio_desc[ARCH_NR_GPIOS];
int gpiochip_add(struct gpio_chip *chip)
{
 unsigned long flags;
 int  status = 0;
 unsigned id;
 int  base = chip->base;

 if ((!gpio_is_valid(base) || !gpio_is_valid(base + chip->ngpio - 1))
   && base >= 0) {
  status = -EINVAL;
  goto fail;
 }

 spin_lock_irqsave(&gpio_lock, flags);

 if (base < 0) {
  base = gpiochip_find_base(chip->ngpio);
  if (base < 0) {
   status = base;
   goto unlock;
  }
  chip->base = base;
 }

 /**
          *these GPIO numbers must not be managed by another gpio_chip
          *換句話說就是沒有重複到其他gpio_chip定義的號碼
        */
 for (id = base; id < base + chip->ngpio; id++) {
  if (gpio_desc[id].chip != NULL) {
   status = -EBUSY;
   break;
  }
 }
 if (status == 0) {
     for (id = base; id < base + chip->ngpio; id++) {
         //將這個chip上的所有GPIO的定義加入gpio_desc
                gpio_desc[id].chip = chip;

  /* REVISIT:  most hardware initializes GPIOs as
   * inputs (often with pullups enabled) so power
   * usage is minimized.  Linux code should set the
   * gpio direction first thing; but until it does,
   * we may expose the wrong direction in sysfs.
   */
  gpio_desc[id].flags = !chip->direction_input
   ? (1 << FLAG_IS_OUT)
   : 0;
     }
 }

 of_gpiochip_add(chip);

unlock:
 spin_unlock_irqrestore(&gpio_lock, flags);

 if (status)
  goto fail;

 status = gpiochip_export(chip);
 if (status)
  goto fail;

 return 0;
fail:
 /* failures here can mean systems won't boot... */
 pr_err("gpiochip_add: gpios %d..%d (%s) failed to register\n",
  chip->base, chip->base + chip->ngpio - 1,
  chip->label ? : "generic");
 return status;
}
EXPORT_SYMBOL_GPL(gpiochip_add);
到這裡,我們的kernel已經多了wm8994這個chip的GPIO可以使用了。但是從我們呼叫gpio_direction_input是怎麼跑到driver定義的wm8994_gpio_direction_in呢?
GPIOLIB與CHIP DRIVER結合
我們看一下gpio_direction_input() 的code。
int gpio_direction_input(unsigned gpio)
{
 unsigned long  flags;
 struct gpio_chip *chip;
 struct gpio_desc *desc = &gpio_desc[gpio];
 int   status = -EINVAL;

 spin_lock_irqsave(&gpio_lock, flags);
        //先檢查這個gpio是否valid
 if (!gpio_is_valid(gpio))
  goto fail;
        //找到這個gpio屬於哪個chip的
 chip = desc->chip;
        //如果chip不存在或這個gpio不能設為input則return fail
 if (!chip || !chip->get || !chip->direction_input)
  goto fail;

        //下面兩行檢查該GPIO的編號是否在該chip的範圍內
 gpio -= chip->base;
 if (gpio >= chip->ngpio)
  goto fail;
 status = gpio_ensure_requested(desc, gpio);
 if (status < 0)
  goto fail;

 /* now we know the gpio is valid and chip won't vanish */

 spin_unlock_irqrestore(&gpio_lock, flags);

 might_sleep_if(chip->can_sleep);

 if (status) {
                //呼叫chip定義的request檢查是否可用
  status = chip->request(chip, gpio);
  if (status < 0) {
   pr_debug("GPIO-%d: chip request fail, %d\n",
    chip->base + gpio, status);
   /* and it's not available to anyone else ...
    * gpio_request() is the fully clean solution.
    */
   goto lose;
  }
 }
        //如果是可用的,call chip的direction_input()
 status = chip->direction_input(chip, gpio);
 if (status == 0)
  clear_bit(FLAG_IS_OUT, &desc->flags);

 trace_gpio_direction(chip->base + gpio, 1, status);
lose:
 return status;
fail:
 spin_unlock_irqrestore(&gpio_lock, flags);
 if (status)
  pr_debug("%s: gpio-%d status %d\n",
   __func__, gpio, status);
 return status;
}
EXPORT_SYMBOL_GPL(gpio_direction_input);
至此,應該就都串起來了吧!簡單來說就如下圖:

.jpg)
