2014年4月4日 星期五

大資料資料庫儲存--傳統的解決方案(I)

The problem

以MySQL為例,在一個table裡面存放10,000筆資料絕對不是問題。但是,當我們的資料上升到十萬筆、一百萬筆甚至一千萬筆,這個時候對資料庫的影響是什麼?當使用者數量一多,資料庫是否依舊能夠在一定的時間內回覆使用者的要求呢?

Traditional Solution

傳統的解決方法不代表是個落伍的、被淘汰的方法。相對的,是一個被證明可以有效解決是個能夠在Production中實作的一些方法。而事實上,大多數的網站仍舊使用這些方法來解決既有大資料量的問題。
Partition和Sharing最大的差別在-Partition是將一個table的資料切割放置到多個table;而sharing則是將一個table的資料放置到多個database中(通常是多台資料庫實體)。

Pros and Cons

那麼,partition和sharing各有什麼優缺點呢?

 Partition

大多數的資料庫其實都已經支援了Partition。Partition的設定方式主要是告訴資料庫要以哪一個column為依據,設定切割的條件。例如int的欄位,可以設定成1~1000為一個table、2000~3000一個table、剩下的一個table。

Partition相對於sharding最大的好處是不需要重寫SQL Logic。資料庫會根據搜尋的條件至相對應的table做query。

但最大的缺點是,儘管是切割成多個table但仍舊是放在同一個database。通常,隨著資料量增加也代表使用者變多了,當然request也變多了。資料庫的效能仍舊受限於該台資料庫所能提供的throughput。

Sharding

Sharding顧名思義的就是將一個table的資料切割放置到多台資料庫中。在實作上,我們可以自己改寫SQL Logic根據我們切割的條件來決定該request要發送到哪一台database。或者,我們也可以看到有許多framework來幫助你完成這件事。例如,MySQL FabricVitessGizzardJetpants等等。

Sharding好處是資料庫的throughput可以隨著資料庫實體的增加而提升也就是scale out的solution。但最大的壞處是,因為資料散落在不同的資料庫,因此你可能做不到join沒有ACID transaction而且因為所有的查尋會因為資料切割的條件變得更複雜。

How about Big Requests?

前面有提到,資料量的提升通常也代表使用量變多隨之而來的request也變多了。假設我們已經把資料shard到不同資料庫了,我們要怎麼分散流量呢? Open Source的Load balancer solution是  HAProxy, Nginx或是MySQL Proxy(beta),當然也可以購買貴鬆鬆Hardware load balancer。

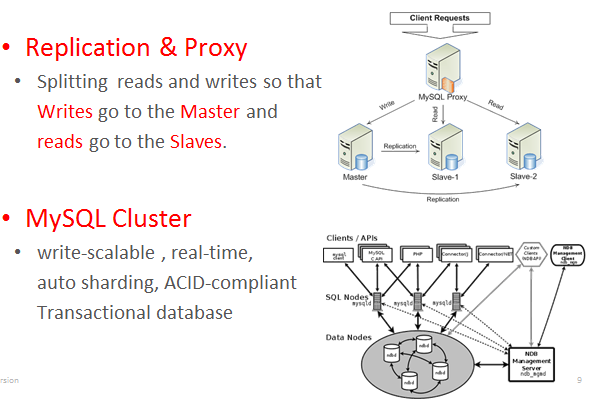
另外,MySQL也有MySQL Cluster可以做到load balancer、auto sharding等等。不過就不在本篇的討論中了。

2012年7月27日 星期五

Design Pattern: Singleton in JAVA, C#, C++

定義:
         保證一個class只有一個實體(Instance),並為它提供一個全域的訪問點(global access point)。

有的時候我們希望某個Class只會有一個Instance被產生。例如,Android中如果多個thread去access同一個DB就會產生錯誤。因此我們可能會希望透過一個Instance統一由他去Access 同一個DB。

JAVA中實作的方式如下:
public class Singleton {
    private volatile Singleton instance = null;
        public Singleton getInstance() {
            if (instance == null) {
                synchronized(this) {
                    if (instance == null)
                        instance = new Singleton();
                }
            }
            return instance;
        }
    }

深入探討:
為了避免multi-thread 的race condition發生及效率,這裡使用double check locking。避免race condtion的發生所以使用synchronized()。但是synchronized()可能造成performance的低落。因此在外層先判斷如果真的是null才進入critical section否則直接return。


在JDK 4(包含)以下的版本不支援volatile。volatile保證再每次取此變數的值時會去memory抓取而非從cache讀取。不加volatile有可能導致程式碼執行順序被 re-order。進而發生其他thread執行實可能看到非null的instance(但他這個時候明明是null)。

另外,上述的作法是lazy-Initialization的作法。也就是說當真正需要的時候才會被new出來。但是如果我們很確定程式中一定會去new這個物件,其實先把他new 出來也不會有什麼損失。


Singleton without Lazy-Initialization
public class Singleton {
    private volatile Singleton instance = new Singleton();
        public Singleton getInstance() {
            return instance;
        }
    }

這樣做的另外一個好處 程式碼看起來也比較清爽。
_____________________________________________________________________________________________________________


C#方式如下:
using System;

public sealed class Singleton
{
   private static volatile Singleton instance;
   private static object syncRoot = new Object();

   private Singleton() {}

   public static Singleton Instance
   {
      get 
      {
         if (instance == null) 
         {
            lock (syncRoot) 
            {
               if (instance == null) 
                  instance = new Singleton();
            }
         }

         return instance;
      }
   }
}

在上面的code中,使用sealed來避免被繼承進而發生可能產生多個instance。另外使用lock的方法來避免multi-thread的race condition。如同在JAVA說的,volatile可以避免out of order所造成的問題。另外,如果不需要lazy-initialization我們可以這樣寫:
public sealed class Singleton
{
   private static readonly Singleton instance = new Singleton();
   
   private Singleton(){}

   public static Singleton Instance
   {
      get 
      {
         return instance; 
      }
   }
}


使用readonly來保證instance只會在static initialization過程時或是在class constructor裡被建立。
_____________________________________________________________________________________________________________


C++的實作就比較簡單了
class Singleton {
public: 
    static Singleton* Instance(){
    if (_instance == 0) {
        _instance = new Singleton;
    }
    return _instance;
}
protected: 
    Singleton();
private:
    static Singleton* _instance=0;
}

然而這個作法不是thread safe的。在C++使用如上面提到的Double checked locking方法及使用volatile並不能保證out of order的問題。也就是說在C++上面使用volatile並無法像C#/JAVA上面來保證使用volatile的variable 不會被re-order。因此像下面的DCL的code還是無法保證Thread-Safe。
class  Singleton {  
public :  
    static  Singleton* Instance() {  
        Lock lock;  
        if  (_instance == 0) {  
            _instance =  new  Singleton;  
        }  
        return  _instance;  
    }  
private :  
    static  Singleton *  volatile  _instance;  
    Singleton(){  
    }  
};  

最後看到Solstice使用pthread解決這問題,如下:

#include 
template<typename T>
class Singleton : boost::noncopyable
{
public:
    static T& instance()
    {
        pthread_once(&ponce_, &Singleton::init);
        return *value_;
    }
    static void init()
    {
        value_ = new T();
    }
private:
    static pthread_once_t ponce_;
    static T* value_;
};
template<typename T>
pthread_once_t Singleton<T>::ponce_ = PTHREAD_ONCE_INIT;
template<typename T>
T* Singleton<T>::value_ = NULL;

Reference:
                 Gossip@caterpillar Design Pattern: Simple Factory 模式
                 The "Double-Checked Locking is Broken" Declaration
                 MSDN:Implementing Singleton in C#
                 多线程服务器的常用编程模型

2012年7月20日 星期五

2012年7月18日 星期三

I2C簡介(二)

前一篇簡單說明了如果寫I2C device的driver。這篇主要要介紹I2C adapter(controller的Driver)。在這裡我們直接以Tegra3的I2C Controller為例來說明。要注意的是,一個板子可能會有很多controller,而一個controller可能會有多條bus。每一個bus會對應一個adapter。

  • Board-Specific Code
Tegra3的board-specific code在arch/arm/mach-tegra/device.c 及arch/arm/mach-tegra/board-cardhu.c中。從source code我們可以看出Tegra 3有五組I2C controller。我們先看device.c的部份,在這裡主要是填寫platform_device的資料如下:
//arch/arm/mach-tegra/device.c
static struct resource i2c_resource1[] = {
 [0] = {
  .start = INT_I2C,
  .end = INT_I2C,
  .flags = IORESOURCE_IRQ,
 },
 [1] = {
  .start = TEGRA_I2C_BASE,
  .end = TEGRA_I2C_BASE + TEGRA_I2C_SIZE-1,
  .flags = IORESOURCE_MEM,
 },
};
                               .
                               .
                               .

static struct resource i2c_resource5[] = {
 [0] = {
  .start  = INT_I2C5,
  .end    = INT_I2C5,
  .flags  = IORESOURCE_IRQ,
 },
 [1] = {
  .start = TEGRA_I2C5_BASE,
  .end = TEGRA_I2C5_BASE + TEGRA_I2C5_SIZE-1,
  .flags = IORESOURCE_MEM,
 },
};
#endif

static struct tegra_i2c_platform_data tegra_i2c1_platform_data = {
 .bus_clk_rate   = { 400000 },
};
                               .
                               .
                               .

static struct tegra_i2c_platform_data tegra_dvc_platform_data = {
 .bus_clk_rate   = { 400000 },
};

struct platform_device tegra_i2c_device1 = {
 .name  = "tegra-i2c",
 .id  = 0,
 .resource = i2c_resource1,
 .num_resources = ARRAY_SIZE(i2c_resource1),
 .dev = {
  .platform_data = &tegra_i2c1_platform_data,
 },
};
                               .
                               .
                               .

struct platform_device tegra_i2c_device5 = {
 .name  = "tegra-i2c",
 .id  = 4,
 .resource = i2c_resource5,
 .num_resources = ARRAY_SIZE(i2c_resource5),
 .dev = {
  .platform_data = 0,
 },
};
接著我們繼續看board-cardhu.c。不知道為什麼,在這邊又把platform_data蓋掉@@。
static struct tegra_i2c_platform_data cardhu_i2c1_platform_data = {
 .adapter_nr = 0,
        //設定這個controller有幾個bus
 .bus_count = 1,
 .bus_clk_rate = { 100000, 0 },
 .scl_gpio  = {TEGRA_GPIO_PC4, 0},
 .sda_gpio  = {TEGRA_GPIO_PC5, 0},
 .arb_recovery = arb_lost_recovery,
};

                               .
                               .
                               .

static struct tegra_i2c_platform_data cardhu_i2c5_platform_data = {
 .adapter_nr = 4,
 .bus_count = 1,
 .bus_clk_rate = { 400000, 0 },
 .scl_gpio  = {TEGRA_GPIO_PZ6, 0},
 .sda_gpio  = {TEGRA_GPIO_PZ7, 0},
 .arb_recovery = arb_lost_recovery,
};

static struct i2c_board_info __initdata cardhu_codec_wm8903_info = {
 I2C_BOARD_INFO("wm8903", 0x1a),
 .irq = TEGRA_GPIO_TO_IRQ(TEGRA_GPIO_CDC_IRQ),
 .platform_data = &cardhu_wm8903_pdata,
};

static struct i2c_board_info __initdata cardhu_codec_aic326x_info = {
 I2C_BOARD_INFO("aic3262-codec", 0x18),
 .irq = TEGRA_GPIO_TO_IRQ(TEGRA_GPIO_CDC_IRQ),
};

static struct i2c_board_info __initdata cardhu_codec_max98095_info = {
 I2C_BOARD_INFO("max98095", 0x10),
 .irq = TEGRA_GPIO_TO_IRQ(TEGRA_GPIO_CDC_IRQ),
 .platform_data = &cardhu_max98095_pdata,
};

static void cardhu_i2c_init(void)
{
 tegra_i2c_device1.dev.platform_data = &cardhu_i2c1_platform_data;
                        .
                               .
                               .

 tegra_i2c_device5.dev.platform_data = &cardhu_i2c5_platform_data;

 platform_device_register(&tegra_i2c_device5);
                        .
                               .
                               .

 platform_device_register(&tegra_i2c_device1);

        
}

  •  I2C Controller Driver

看完了platform_device的宣告後,我們理所當然的去看platform_driver的地方。實作的位置在driver/i2c/busses/i2c-tegra.c。這裡我們從tegra_i2c_init_driver()看起。
static int tegra_i2c_probe(struct platform_device *pdev)
{
 struct tegra_i2c_dev *i2c_dev;
 struct tegra_i2c_platform_data *plat = pdev->dev.platform_data;
 struct resource *res;
 struct resource *iomem;
 struct clk *div_clk;
 struct clk *fast_clk = NULL;
 const unsigned int *prop;
 void *base;
 int irq;
 int nbus;
 int i = 0;
 int ret = 0;

        //取得定義在device.c的platform_device 的resource且flag為IORESOURCE_MEM 的資料
 res = platform_get_resource(pdev, IORESOURCE_MEM, 0);
 
        //檢查從res->start~res->start+ resource_size(res)是否可用
        iomem = request_mem_region(res->start, resource_size(res), pdev->name);
 
        //mapping到kernel虛擬空間
 base = ioremap(iomem->start, resource_size(iomem));
 
 div_clk = clk_get(&pdev->dev, "i2c-div");
 
 fast_clk = clk_get(&pdev->dev, "i2c-fast");
 
        i2c_dev = kzalloc(sizeof(struct tegra_i2c_dev) +
     (nbus-1) * sizeof(struct tegra_i2c_bus), GFP_KERNEL);
 

 i2c_dev->base = base;
 i2c_dev->div_clk = div_clk;
 i2c_dev->fast_clk = fast_clk;
 i2c_dev->iomem = iomem;
 i2c_dev->irq = irq;
 i2c_dev->cont_id = pdev->id;
 i2c_dev->dev = &pdev->dev;
 i2c_dev->is_clkon_always = plat->is_clkon_always;

 i2c_dev->last_bus_clk_rate = 100000; /* default clock rate */
 i2c_dev->last_bus_clk_rate = plat->bus_clk_rate[0];
        i2c_dev->is_high_speed_enable = plat->is_high_speed_enable;
 i2c_dev->last_bus_clk_rate = plat->bus_clk_rate[0] ?: 100000;
 i2c_dev->msgs = NULL;
 i2c_dev->msgs_num = 0;
 rt_mutex_init(&i2c_dev->dev_lock);
 spin_lock_init(&i2c_dev->fifo_lock);

 i2c_dev->slave_addr = plat->slave_addr;
 i2c_dev->hs_master_code = plat->hs_master_code;
 i2c_dev->is_dvc = plat->is_dvc;
 i2c_dev->arb_recovery = plat->arb_recovery;
 init_completion(&i2c_dev->msg_complete);

 if (irq == INT_I2C || irq == INT_I2C2 || irq == INT_I2C3)
  i2c_dev->is_slave = true;

 platform_set_drvdata(pdev, i2c_dev);

 if (i2c_dev->is_clkon_always)
  tegra_i2c_clock_enable(i2c_dev);

 ret = tegra_i2c_init(i2c_dev);
 if (ret) {
  dev_err(&pdev->dev, "Failed to initialize i2c controller");
  goto err_free;
 }


 for (i = 0; i < nbus; i++) {
  struct tegra_i2c_bus *i2c_bus = &i2c_dev->busses[i];

  i2c_bus->dev = i2c_dev;
  i2c_bus->mux = plat->bus_mux[i];
  i2c_bus->mux_len = plat->bus_mux_len[i];
  i2c_bus->bus_clk_rate = plat->bus_clk_rate[i] ?: 100000;

  i2c_bus->scl_gpio = plat->scl_gpio[i];
  i2c_bus->sda_gpio = plat->sda_gpio[i];

  i2c_bus->adapter.dev.of_node = pdev->dev.of_node;
  i2c_bus->adapter.algo = &tegra_i2c_algo;
  i2c_set_adapdata(&i2c_bus->adapter, i2c_bus);
  i2c_bus->adapter.owner = THIS_MODULE;
  i2c_bus->adapter.class = I2C_CLASS_HWMON;
  strlcpy(i2c_bus->adapter.name, "Tegra I2C adapter",
   sizeof(i2c_bus->adapter.name));
  i2c_bus->adapter.dev.parent = &pdev->dev;
  i2c_bus->adapter.nr = plat->adapter_nr + i;

                //!!將此bus註冊進kernel中
  ret = i2c_add_numbered_adapter(&i2c_bus->adapter);
                //註冊此bus的adapter
  of_i2c_register_devices(&i2c_bus->adapter);

  i2c_dev->bus_count++;
 }

 return 0;
        ...
}

static struct platform_driver tegra_i2c_driver = {
 .probe   = tegra_i2c_probe,
 .remove  = tegra_i2c_remove,
 .driver  = {
  .name  = "tegra-i2c",
  .owner = THIS_MODULE,
  .of_match_table = tegra_i2c_of_match,
  .pm    = TEGRA_I2C_DEV_PM_OPS,
 },
};

static int __init tegra_i2c_init_driver(void)
{
        //註冊tegra_i2c_driver,跳到tegra_i2c_probe繼續看
 return platform_driver_register(&tegra_i2c_driver);
}
subsys_initcall(tegra_i2c_init_driver);
  • Reference
  1. Introduction to I2C
  2. Linux I2C driver: what's new-style !?
  3. I2C总线使用方法继续研究
  4. nVidia Tegra Kernel Source

I2C簡介(一)

  • I2C簡介
I2C 全名是Inter IC,原先是Phillips發展的一個two-wire 的serial bus protocol。他是一種半雙工同步多組設備匯流排。只需要兩條線:串列資料線(SDA)與串列時脈線(SCL or SCK)。I2C 提供兩種定址模式與三種傳輸模式。定址方面分成10-bit(允許連接1024個裝置)與 7-bit (允許連接128個裝置)。傳輸方面則有10kbps 的低速模式、100kbps 的標準模式、及 400kbps 的快速模式。
I2C連接的裝置都是Open Drain的接腳,也就是說導通的時候電位是low,而不導通時為high。I2C通常用在嵌入式系統與不同的裝置溝通。在PC,I2C通常用來與不同的sensor 連結例如取得系統風扇的轉速、CPU的溫度等等。
  • I2C in Linux
I2C 在kernel 2.x的時候開始支援。在Linux Kernel中,I2C的code拆成四個部份: I2C core、I2C bus drivers、I2C algorithm drivers 和 I2C chip drivers。

舉一個例子,一個PMU(power management unit)利用I2C與SOC連結。要使PMU能夠正確運作我們必須先撰寫I2C adapter(controller)的driver,讓I2C bus可以正常運作。I2C adapter(controller)可能是外接的chip也可能是在SOC裡頭例如Tegra3擁有五組I2C controller。再來,我們必須撰寫PMU的driver,註冊進正確的I2C bus中。透過adapter(controller)與device溝通。
這一篇的介紹是在於如何撰寫下圖的i2c client driver來控制(R/W)i2c device。
一個板子可能會有很多controller,而一個controller可能會有多條bus。每一個bus會對應一個adapter。
  • 撰寫I2C Device Driver
在這裡我們直接以TI的PMU tps6591為例子說明。原始碼一樣可以透過下面 reference中抓取。
我們首先先看看tps6591 board-specific code的地方。我們看cardhu_regulator_init()。
//arch/arm/mach-tegra/board-cardhu-power.c
static struct tps6591x_platform_data tps_platform = {
        //pmu的irq起始編號
 .irq_base = TPS6591X_IRQ_BASE,
        //gpio的起始編號
 .gpio_base = TPS6591X_GPIO_BASE,
 .dev_slp_en = true,
 .slp_keepon = &tps_slp_keepon,
 .use_power_off = true,
};

static struct i2c_board_info __initdata cardhu_regulators[] = {
    {
        //設定pmu的i2c device number
        I2C_BOARD_INFO("tps6591x", 0x2D),
        .irq    = INT_EXTERNAL_PMU,
        .platform_data = &tps_platform,
    },
};

int __init cardhu_regulator_init(void){
    ...
    /**註冊i2c device進list: __i2c_board_list
      *bus number=4  
      *device info=cardhu_regulators
      *#device=1 
    */
    i2c_register_board_info(4, cardhu_regulators, 1);
    ...
}
接著在tps6591的driver中,我們從tps6591x_init()看起。
//driver/mfd/tps6591x.c

static int __devinit tps6591x_i2c_probe(struct i2c_client *client,
     const struct i2c_device_id *id)
{
 struct tps6591x_platform_data *pdata = client->dev.platform_data;
 struct tps6591x *tps6591x;
 int ret;

 if (!pdata) {
  dev_err(&client->dev, "tps6591x requires platform data\n");
  return -ENOTSUPP;
 }

 ret = i2c_smbus_read_byte_data(client, TPS6591X_VERNUM);
 if (ret < 0) {
  dev_err(&client->dev, "Silicon version number read"
    " failed: %d\n", ret);
  return -EIO;
 }

 dev_info(&client->dev, "VERNUM is %02x\n", ret);

 
        //same as dev_set_drvdata(&dev->dev, data);
 i2c_set_clientdata(client, tps6591x);

 mutex_init(&tps6591x->lock);

 ...

 tps6591x_i2c_client = client;

 return 0;

err_add_devs:
 if (client->irq)
  free_irq(client->irq, tps6591x);
err_irq_init:
 kfree(tps6591x);
 return ret;
}

static struct i2c_driver tps6591x_driver = {
 .driver = {
  .name = "tps6591x",
  .owner = THIS_MODULE,
 },
 .probe  = tps6591x_i2c_probe,
 .remove  = __devexit_p(tps6591x_i2c_remove),
#ifdef CONFIG_PM
 .suspend = tps6591x_i2c_suspend,
 .resume  = tps6591x_i2c_resume,
#endif
 .id_table = tps6591x_id_table,
};

static int __init tps6591x_init(void)
{
        /**註冊I2C device driver
         *將這個driver與bus做配對並呼叫probe
        */
 return i2c_add_driver(&tps6591x_driver);
}
  • R/W VIA I2C
如何從I2C device讀取資料呢?我們以 tps6591x_read為例:
static inline int __tps6591x_read(struct i2c_client *client,
      int reg, uint8_t *val)
{
 int ret;
        //read data from address:reg
 ret = i2c_smbus_read_byte_data(client, reg);
 if (ret < 0) {
  dev_err(&client->dev, "failed reading at 0x%02x\n", reg);
  return ret;
 }

 *val = (uint8_t)ret;

 return 0;
}


讀取資料呢?我們以 tps6591x_write為例:
static inline int __tps6591x_write(struct i2c_client *client,
     int reg, uint8_t val)
{
 int ret;
        //write value:val to address:reg
 ret = i2c_smbus_write_byte_data(client, reg, val);
 if (ret < 0) {
  dev_err(&client->dev, "failed writing 0x%02x to 0x%02x\n",
    val, reg);
  return ret;
 }

 return 0;
}

其他的 read/write可以參考driver/i2c/i2c-core.c
  • Reference
  1. Introduction to I2C
  2. Linux I2C driver: what's new-style !?
  3. I2C总线使用方法继续研究
  4. nVidia Tegra Kernel Source

2012年7月11日 星期三

Linux Kernel Portability-Data type & Data Structure in Linux kernel (二)

上一篇著重於Linux Kernel 的Portability。這一篇將著重於Linux Kernel的Data Structure。這裡要介紹的Data Structure包括了Linked lists、Queues、Maps、及Binary trees。

  • Linked List
這裡直接講用法。Linux Kernel的Linked List是Double Linked List,而且List裡面的元素必須是list_head的structure。舉個例好了,我們要做到如下圖(A B C都是struct sample好了):
struct sample{
    struct list_head link;
    vold *content;
}
struct sample *A,*B,*C;
現在我們要把ABC串起來。首先我們建立一個叫list_head的Linked list的變數,並初始化它。常見的方法有兩種,結果是一樣的。
/**
*1. LIST_HEAD(name)
*2. INIT_LIST_HEAD
*/
//method 1
static LIST_HEAD(list_head);

//method 2
struct list_head list_head;
INIT_LIST_HEAD(&list_head);
接著假設我們要先加入A和C,利用list_add()將A加入到list_head後面。然後在將C加入到A後面。
//Add A after list_head,list_head is the head of the list
//e.g list_head->A
list_add(&A->link,&list_head);

//Add C after A e.g list_head->A->C
list_add(&C->link,&A->link);
接著,我們要利用list_add_tail將B加在C之前
//Add B before C e.g list_head->A->B->C
list_add_tail(&B->link,&C->link);
加完了之後我們要怎麼列出List裡面的項目呢?可以利用list_for_each來達成。
//list_for_each(struct list_head *cursor, struct list_head *list)
list_for_each(&A->link,&list_head){

}
更多的用法可見<linux/list.h>

  • Queue 
Linux Kernel的queue叫做kfifo實做在kernel/kfifo.c 宣告在<linux/kfifo.h>。與我們所知的queue相同,kfifo支援enqueue(函式命名成inqueue)跟dequeue。同樣的,kfifo有兩個offset分別是記錄下一個插入位置的enqueue offset跟下一個取出位置的dequeue offset。
接下來介紹kfifo的使用方式分為 1. Declare  2. Enqueue/Dequeue 3. Other operation
Declare 
a. 利用kfifo_alloc() 動態宣告   
struct kfifo fifo;
int ret;
      //宣告一個大小為PAGE_SIZE的queue
ret = kfifo_alloc(&kifo, PAGE_SIZE, GFP_KERNEL);
if (ret)
return ret;

b. 利用DECLARE_KFIFO(name, size)建立 INIT_KFIFO(name)初始化。
Enqueue/Dequeue
kfifo_in(fifo, buf, n) 將n byte的buf讓入fifo裡。如果fifo free的大小<n 則只會copy free 的size的資料 
kfifo_out(fifo, buf, n) copy n byte到buf中。如果fifo的大小<n 則只會copy fifo大小的data
kfifo_out_peek(fifo, buf, n) kfifo_out執行後data就會從fifo中刪除。如果想保留可以使用kfifo_out_peek
Other Operation 
kfifo_size(fifo) 取得fifo大小
kfifo_len(fifo) 取得fifo已使用大小
kfifo_avail(fifo) 取得fifo可使用大小
kfifo_is_empty(fifo) 判斷fifo是否為空
kfifo_is_full(fifo) 判斷fifo是否已滿
kfifo_reset(fifo) 清空fifo。
kfifo_free(fifo) free掉fifo
實際的操作範例
struct kfifo fifo;
int ret;

//宣告一個大小為PAGE_SIZE的queue
ret = kfifo_alloc(&kifo, PAGE_SIZE, GFP_KERNEL);
if (ret)
    return ret;
int i;
//插入32個size為sizeof(int)的[0,31]到fifo中
for (i = 0; i < 32; i++)
    kfifo_in(fifo, &i; sizeof(i));

unsigned int val;
int ret;

//從fifo讀取一個integer到val 中。資料不會被刪除
ret = kfifo_out_peek(fifo, &val, sizeof(val));
if (ret != sizeof(val))
    return -EINVAL;

printk(KERN_INFO “%u\n”, val); /* should print 0 */


/* while there is data in the queue ... */
while (kfifo_avail(fifo)) {
    unsigned int val;
    int ret;
    /* ... read it, one integer at a time */
    ret = kfifo_out(fifo, &val, sizeof(val));
    if (ret != sizeof(val))
        return -EINVAL;

    printk(KERN_INFO “%u\n”, val);
}
  • Red-Black Tree
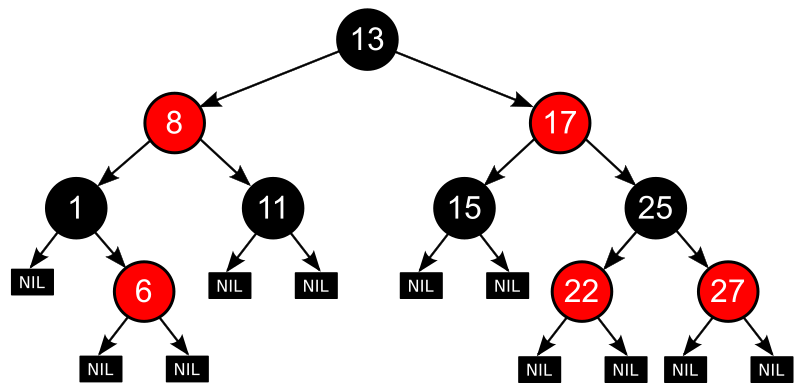
紅黑樹是一種semi-balanced binary tree(自平衡二元樹)。主要有以下六種性質:
  1. 節點不是紅色就是黑色。
  2. 根節點是黑色。
  3. 所有葉子都是黑色(葉子是NIL節點 e.g不包含資料)。
  4. 每個紅色節點的兩個子節點都是黑色。(從每個葉子到根的所有路徑上不能有兩個連續的紅色節點)
  5. 從任一節點到其每個葉子的所有最短路徑都包含相同數目的黑色節點。

紅黑樹在Linux Kernel實作的地方是lib/rbtree.c宣告的地方在<linux/rbtree.h>。這裡直接以 driver/media/video/tegra/avp/avp.c裡面的實作來解釋rbtree的使用。avp.c定義了一個tegra_avp_info的struct,以下擷取其實做。要使用rbtree必須要宣告一個rb_root的變數如下:
struct tegra_avp_info {
 ...
 struct rb_root  endpoints;
        ...
};
要開始使用endpoints這個rbtree之前必須給他初始的值"RB_ROOT"如下:
static int tegra_avp_probe(struct platform_device *pdev)
{
    struct   *avp;
    avp = kzalloc(sizeof(struct tegra_avp_info), GFP_KERNEL);
    ...
    avp->endpoints = RB_ROOT;
    ...
}
Linux Kernel的rbtree不包含插入及搜尋的函式,下面同樣以avp的"插入"來說明。
static struct remote_info *remote_find(struct tegra_avp_info *avp, u32 local_id)
{
 struct rb_node *n = avp->endpoints.rb_node;
 struct remote_info *rinfo;

 while (n) {
  rinfo = rb_entry(n, struct remote_info, rb_node);

  if (local_id < rinfo->loc_id)
   n = n->rb_left;
  else if (local_id > rinfo->loc_id)
   n = n->rb_right;
  else
   return rinfo;
 }
 return NULL;
}
以上例,remote_find()實作搜尋的功能。while loop會traverse整個tree 直到找到相同的id。
static int remote_insert(struct tegra_avp_info *avp, struct remote_info *rinfo)
{
 struct rb_node **p;
 struct rb_node *parent;
 struct remote_info *tmp;

 p = &avp->endpoints.rb_node;
 parent = NULL;
 while (*p) {
  parent = *p;
  tmp = rb_entry(parent, struct remote_info, rb_node);

  if (rinfo->loc_id < tmp->loc_id)
   p = &(*p)->rb_left;
  else if (rinfo->loc_id > tmp->loc_id)
   p = &(*p)->rb_right;
  else {
   pr_info("%s: avp endpoint id=%x (%s) already exists\n",
    __func__, rinfo->loc_id,
    trpc_name(rinfo->trpc_ep));
   return -EEXIST;
  }
 }
 rb_link_node(&rinfo->rb_node, parent, p);
 rb_insert_color(&rinfo->rb_node, &avp->endpoints);
 rinfo_get(rinfo);
 return 0;
}

以上例,while loop會traverse rbtree去尋找適合的頁節點,然後透過rb_link_node()去link parent。接著再透過rb_insert_color()上色。
static void remote_remove(struct tegra_avp_info *avp, struct remote_info *rinfo)
{
 rb_erase(&rinfo->rb_node, &avp->endpoints);
 rinfo_put(rinfo);
}
刪除節點很簡單,只要呼叫rb_erase()即可。

  • Radix Tree
Radix Tree使用相對於Red Block Tree來說簡單許多。這裡以之前提過得irq實做為例看看Radix Tree怎麼使用。
Radix Tree實做在lib/radix- tree.c,下面以kernel/irqdesc.c來了解。
//Declare a radix tree called irq_desc_tree
static RADIX_TREE(irq_desc_tree, GFP_KERNEL);

static void irq_insert_desc(unsigned int irq, struct irq_desc *desc)
{
        //Insert  into irq_desc_tree
 radix_tree_insert(&irq_desc_tree, irq, desc);
}

struct irq_desc *irq_to_desc(unsigned int irq)
{
        //取得key為irq的value
 return radix_tree_lookup(&irq_desc_tree, irq);
}

static void delete_irq_desc(unsigned int irq)
{
        //刪除key為irq的pair
 radix_tree_delete(&irq_desc_tree, irq);
}

  • Reference
上一篇:Linux Kernel Portability-Data type & Data Structure in Linux kernel (一)

2012年7月10日 星期二

Linux Kernel Portability-Data type & Data Structure in Linux kernel (一)

  • 前言
Linux作為一個跨平台(處理器)的作業系統必須兼容許多不同的CPU 架構設計。也因此,Linux Kernel裡面有許多是為了Portability而產生的包含衍生的資料型態及提供的資料結構。
為了讓我們的Kernel 的module可以順利在我們的Target上或在各平台上順利執行,我們勢必就需要了解哪些方面會是Platform-Independent,Linux Kernel如何解決這個問題。
  • The Size of Data Types
在說明Kernel專有的資料型態前,我們先了解標準C資料型態在各平台的差異。以下圖為例,在常見的平台上,char、short、int、long long大小是一致的。但是long、ptr、word的大小則會因平台不同而有所差別。因此,如何在各平台確切的得到我們希望的變數大小就非常重要了。換句話說,假設我們希望某個變數他是8個bits,他就不會因為平台的不同而變成立如4個bits。
因此,Linux Kernel就定義了幾個標準大小的資料型態在include/linux/types.h。在include/linux/types.h裡他include了asm/types.h。以ARM平台為例,arch/arm/include/asm/types.h include了asm-generic/int-ll64.h。在int-ll64.h就定義了: 
u8    unsigned byte (8 bits)
u16   unsigned word (16 bits)
u32   unsigned 32-bit value
u64   unsigned 64-bit value
s8    signed byte (8 bits)
s16   signed word (16 bits)
s32   signed 32-bit value
s64   signed 64-bit value
u代表的是unsigned而s則是代表signed分別定義了8~64bits的標準大小型態。假設在user space的程式要使用固定長度的型別,記得前面要加上__例如"__u8"。

然而,C99規範了標準大小的資料型態uintN_t及intN_t對應著uN及sN定義在stdint.h。N代表8、16、 32、64。因此,不管是Kernel Module或是user space 的program特別是如果你的程式是想跨平台(OS)的,就盡量使用C99的資料型態而非Linux Kernel的資料型態。
  • Interface-Specific Types
Linux Kernel為了移植性也定義了許多_t結尾的變數在 <include/types.h>。舉例來說常見的size_t、ssize_t、pid_t、time_t等等根據特定意義的資料型態就稱為Interface-Specific Type。以process 的id pid_t為例,在x86來說是 int,但是假設我們直接將例如getpid()的回傳值用 int用 接收,哪天另外一個平台的pid是long long的話勢必我們程式必須作修改才能正確運行。因此,Interface-Specific Type可以避免移植的問題。 
  • Data Alignment
大多數的CPU都會要求變數擺在特定的記憶體上。例如Intel x86的CPU要求4 byte的integer是放置在4的倍數的記憶體位置。這個就叫做Memory Alignment。但假設不是擺在4的倍數上呢?那就必須要讀取兩次才能得到這個變數。大多數的CPU都可以自己處理這個狀況,但是有些CPU沒辦法處理這個問題,必須要產生exception靠exception handler來處理這個問題,但是這樣效率會非常的慢。有個方法是使用get_unaligned(ptr)取得資料及set_unaligned(val,ptr)寫入資料。例如,在driver/power/bq27x00_battery.c裡面
if (!single)
    ret = get_unaligned_le16(data);
else
    ret = data[0];
如果資料是1個byte就直接讀取否則用get_unaligned_le16()。le代表little-endian

順帶一提,compiler在做最佳化的時候可能會自動做Memory Aligned的動作。但也許我們定義的資料結構變數間的位址是必須連續的(的動作可能會在變數間填補一些變數讓memory可以對齊),這個時候我們可以利用__attribute__ ((packed))告訴編譯器不要亂動 。
struct{
    u16 uid;
    u64 gid;
    u16 val0;
    u32 val1;
}__attribute__ ((packed))structA;
  • Byte Order
假設有一個4 byte的int不同的CPU可能會有不同的記憶體擺法,例如低位的值先放(Little-Endian)還是大的先放(Big-Endian)?舉例來說,假設有一個整數值是0x12345678 Little-Endian的擺法就會是:
address        value
0x00000001     0x78
0x00000002     0x56
0x00000003     0x34
0x00000004     0x12
而如果是Big-Endian的話則是:
address        value
0x00000001     0x12
0x00000002     0x34
0x00000003     0x56
0x00000004     0x78
如果我們要得到Little-Endian順序的值可以使用u32 cpu_to_le32(u32),更多的轉換函式可以在找到。
  • Time
HZ定義了一秒鐘有幾次 Interrupt。他可以是100、250、300或是1000。預設的值可能會隨著 Kernel的版本或編譯Kernel 的設定而改變。因此,我們不可以假設HZ==1000(舊版的Kernel預設是1000)。
順帶一提,Tick是HZ的倒數,因此假設HZ=1000則一個tick就是1毫秒。
Jiffies是Linux Kernel用來紀錄系統自開機以來觸發了幾次Interrupt(開機時並非歸0)。Linux Kernelchewing每秒鐘會將jiffies加1HZ次。我們可以利用Linux Kernel定義的macro(timer_after、time_after_eq、time_before和time_before_eq)來判斷時間。因此,假設我們要判斷時間是否過了三秒可以:
//設定時間是現在的jiffies加上3秒的HZ次
unsigned long timeout = jiffies + (3*HZ);  
while (hwgroup->busy) {  
     ...
  /*如果迴圈超過三秒(也就是說現在的jiffies數超過三秒前的jiffies+3*HZ次)
   *則return -EBUSY
   */
  if (time_after(jiffies, timeout)) {  
    return -EBUSY;  
  }  
  ...  
}  
return SUCCESS; 
  • Page Size
不要假設Page Size是4KB。用Linux Kernel提供的PAGE_SIZE 來取得系統的page size及PAGE_SHIFT取得 要左移的bits數達到其memory page的number。

下一篇:Linux Kernel Portability-Data type & Data Structure in Linux kernel (二)